
reviews
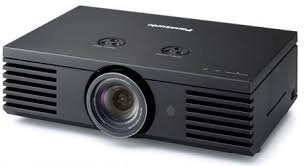
Panasonic PT-AE1000U LCD Front Projector
As this article went to publishing it was reported at HD Library that Panasonic is providing a $1,000 USD rebate and one member found this projector for $2,749 USD. This is nearly half the price of projectors that can do better and taking all of its performance points into perspective this price level definitely hits the bang per buck category of entry level gear representing great value!
| MSRP | Street | Amazon.com | |
| Pricing at publication | $5,999.00 | $3,795.00 | $3,799.00 |
Serial #SG6640008R
Warranty: 1 year parts and labor
Summary: Entertaining big screen pictures at 1080p/24, with the widest installation capability for a front projector
Starting with the PT-AE700 720p projector, Panasonic has built quite a reputation around their extremely wide installation capability and inexpensive pricing using transmissive LCD technology for the last couple of years. Panasonic continues their 720p capability with the PT-AX100 while introducing new 1080p24/60 capability in the form of the PT-AE1000U for a mere $4,000 USD street price, which is expected to get even lower as the months pass. This has certainly been the year for new 1080p front projection below $5,000 USD. Transmissive LCD projection technology is well over a decade old using red, green and blue LCD panels. No color wheel is required and therefore no concerns over rainbows; those are a DLP issue only related to the size and expense of 3 chip capability as well as supply and demand of the devices. In the early days fill factor of the pixels was quite large, creating a screen door effect that could not be missed with less than 8 screen heights. In this area transmissive LCD has improved by leaps and bounds, becoming one of the hallmarks of the Panasonic line; no pixels to be seen at even unreasonably close viewing distances. This technology does come with one thorn though that has yet to be tamed, natural dynamic range. To produce black, transmissive LCD has to block the light trying to pass through it, which remains difficult and results in a poor black response. Transmissive LCD also takes a hit in peak light output due to inefficient pass through losses of the LCD panels. This absorption of light, regardless of image, also requires the LCD panels be constantly cooled lest they or their neighboring optical parts suffer a melt down. One way to improve dynamic range is to employ an auto iris and manipulate the gamma response. Most call this a "dynamic iris". Many are using this technique to enhance the viewer's perception of dynamic range while also improving spec numbers for higher contrast ratios. For a proper ISF calibration, the feature must be turned off or the numbers will never make sense; the feature changes things that much. Many transmissive LCD products use this process to create a competitive perceived dynamic image. This inspired HD Waveform 10 - Dynamic Iris and Gamma, which uses the PT-AE1000 for the measurements. Please see the above article for the specifics. Common Features
- 2 HDMI and 2 component video via RCA inputs, 1 S-video and 1 composite video input, and 1 VGA PC input
- On the top side are two adjustments for vertical and horizontal lens shift. There is a side door containing your control keyboard.
- Aspect controls vary depending on input type and scan rate. All inputs offer 4:3 or 16:9. S-video and composite video add AUTO, 14:9, ZOOM1, ZOOM2 and JUST. HDMI with HD scan rates adds H-FIT, V-FIT and ZOOM. Component with HD scan rates adds H-FIT and V-FIT.
- The remote is a good size, fits the hand well while providing a back light feature when you are in the dark. It is programmable for accessing the basic features of other products.
- Programmable sleep mode turns the projector off automatically by pressing the SLEEP button on the remote and selecting one of 7 fixed durations from 60-240 minutes.
- Horizontal and vertical position adjust is provided and is not to be confused with lens tilt features as you are moving the image on the LCD panels.
- Provides two lamp power settings: NORMAL and ECO-MODE.
- Dynamic Iris with on or off switching
- Lamp hours can be found in the customer menu
- Serial input for external control of the projector
- 14-bit digital video processing
- Provides 7 preset modes for controls and features plus 5 user memories
- Clock and phase adjustments are provided to reduce artifacts or obtain 1:1 pixel mapping with PC or component HD scan rates
- Color management allows 8 points of adjustment, although six is all that is required, and 3 user memories for your defined color space
- Full color temperature and tracking controls plus more
- HDMI supports both video and PC video levels via an HDMI Signal Level adjust
- "Pure Color Filter Pro" for professional-level color reproduction in select modes
- Horizontal and vertical manual lens shift
- Powered 2x zoom and focus
- Waveform Monitor. This is a truly unique and precedent setting feature allowing you to see your signal source including digital HDMI/DVI just like the pros! It displays in frame/field or line modes including Y, G, R, and B signals in both modes. You can select which line you want to view. Adjustment of video setup controls is reflected directly on the monitor. The manual does a decent job of explaining how to use this feature and how to make some adjustments but is far from complete. This allows you to see your signal and know conclusively what is coming from your source for video setup. In fact, you should be able to do a source calibration with this tool provided you do not have the projector calibrated professionally. Video setup adjustments are reflected and a calibration is going to be changing those which change the reference points of 0 and 100IRE for your contrast and brightness settings, as an example.
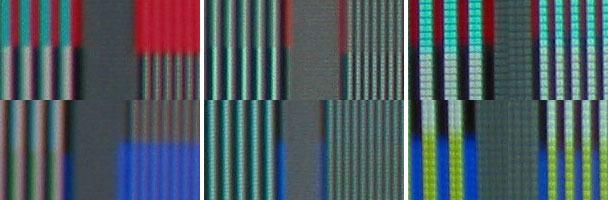 For HDMI the 960 line response is nice for red and possibly oversaturated, lacking for blue and at 1920 there are two errors. Looking at the luminance 1920 you see it lacks the contrast of the 960. There is a graying out of the response as the difference between peak white and black is reduced. Another artifact is that the white lines are fatter than the black ones. If you were here with me you would note that the light from the white pixels are actually leaking into the black ones reducing what is called intra-field contrast ratio. This is not the full story behind this observed response and I cannot tell you if it is a limitation of the technology or the circuitry feeding the LCD panels.
At 1920 you will also note the highly saturated red and blue chroma response bleeding the primary of red or blue in the 1920 pattern removing any trace of the secondary cyan or yellow. This was an odd response and during the review it was not as if this artifact reared its ugly head with video or PC graphics. As noted earlier, video does not support a 1920 chroma response so it would seem safe to say that this would not cause a problem with a video source. On the other hand, if PC graphics are going to be a primary source this could show up with the right image.
From experience this type of response is related to filtering of a multiple line response also representing a specific reoccurring frequency. I have calibrated and tested many displays that could not pass the multiple alternating black and white single pixel burst at all providing only a grayed out field in it's place, yet could pass (not a correct response mind you - but pass) a single pixel white or black line from a pin pattern or the Sencore focus pattern of alternating E's formed out of single pixels. This is yet another example of how just the right image may be required to show the error.
The component 1080i response does not have the color bleed error at 1920. At 960 it does not have the clear pattern of red and cyan or even the ghostly blue and yellow response of HDMI. The 1920 luminance response remains consistent with HDMI. Key point for this test is that there are projectors on the market that pass these patterns correctly via either connection type.
Looking at the reference response you can clearly see each and every line and pixel of either luma or chroma information. This particular reference also shows the difference in pixel visibility between a full 1920x1080 chip DLP and this LCD. On the component 1080i image I happened to catch a clear shot of the LCD pixels; as you can see the fill factor is overwhelming good. While one might suspect that the differences in how these images were captured could easily account for what you are seeing, for the record, they are a fair facsimile of what you would perceive with the naked eye. The lack of detail and soft response is inherent of transmissive LCD technology.
While the projector clearly does 1:1 pixel mapping, this test not only shows response errors but also provides clues as to why a full chip DLP, as an example, would outperform it for detail and sharpness. At the viewing position, you cannot clearly make out pixels or fill factor of the DLP any more than the LCD, yet the perceived difference in response for these patterns would be strikingly clear. With real images you would note a difference in sharpness and detail.
Overscan
Via HDMI, 720p, 1080i, and 1080p all chopped off a few pixels on the right side. This also revealed an interesting observation; the projector remembers vertical and horizontal centering positions by scan rate. Via component analog video, 720p and 1080i had the same result with only a one pixel loss on the left side for 720p.
Calibration Notes
The settings constantly interacted with each other from brightness and contrast to the color temp adjustments; just one single click or numerical change could slightly throw off the whole cart for another round of adjustments. I started with NORMAL and being dissatisfied with the overall results tried CINEMA3, but that was off even more and could only be drawn in using the coarse color temp adjust in the video setup menu. In COLOR1 I found a response very close to standards and this one also used the motorized light reducing gizmo. While not documented, I set this one up achieving a similar response as I had with NORMAL but with an even lower light output. This particular setting did not require a color space adjustment having been preset by the factory on target. For most of the settings the green and blue primaries were increased for additional (and clearly beneficial) light output to sell the product, but pushing the color temperature towards cyan prevents 100% accurate color and fidelity. Another concern was the unexpected lack of fine adjustment making it difficult to get precisely on target for color temperature and tracking. These controls were no different than others I have used in the past, yet they had a coarse response for this projector. I was unable to get an overall delta C response below one, although my 30 and 80 IRE targets were correct.
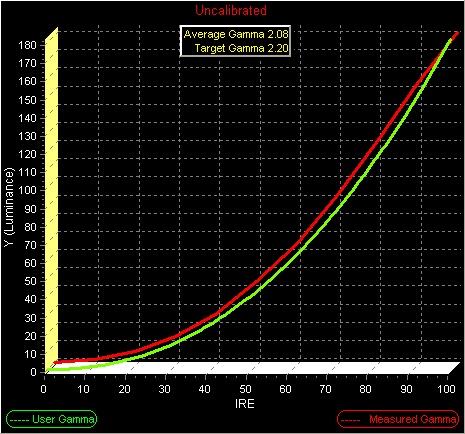
Gamma (Definition)
The gamma response charts consist of a green line representing the target gamma of 2.2 and a red line representing the response of the display. The average gamma figure only has value when the lines match; otherwise your calibrator will look at the individual steps to identify and correct the problem.
NORMAL Gamma Pre-calibration
For HDMI the 960 line response is nice for red and possibly oversaturated, lacking for blue and at 1920 there are two errors. Looking at the luminance 1920 you see it lacks the contrast of the 960. There is a graying out of the response as the difference between peak white and black is reduced. Another artifact is that the white lines are fatter than the black ones. If you were here with me you would note that the light from the white pixels are actually leaking into the black ones reducing what is called intra-field contrast ratio. This is not the full story behind this observed response and I cannot tell you if it is a limitation of the technology or the circuitry feeding the LCD panels.
At 1920 you will also note the highly saturated red and blue chroma response bleeding the primary of red or blue in the 1920 pattern removing any trace of the secondary cyan or yellow. This was an odd response and during the review it was not as if this artifact reared its ugly head with video or PC graphics. As noted earlier, video does not support a 1920 chroma response so it would seem safe to say that this would not cause a problem with a video source. On the other hand, if PC graphics are going to be a primary source this could show up with the right image.
From experience this type of response is related to filtering of a multiple line response also representing a specific reoccurring frequency. I have calibrated and tested many displays that could not pass the multiple alternating black and white single pixel burst at all providing only a grayed out field in it's place, yet could pass (not a correct response mind you - but pass) a single pixel white or black line from a pin pattern or the Sencore focus pattern of alternating E's formed out of single pixels. This is yet another example of how just the right image may be required to show the error.
The component 1080i response does not have the color bleed error at 1920. At 960 it does not have the clear pattern of red and cyan or even the ghostly blue and yellow response of HDMI. The 1920 luminance response remains consistent with HDMI. Key point for this test is that there are projectors on the market that pass these patterns correctly via either connection type.
Looking at the reference response you can clearly see each and every line and pixel of either luma or chroma information. This particular reference also shows the difference in pixel visibility between a full 1920x1080 chip DLP and this LCD. On the component 1080i image I happened to catch a clear shot of the LCD pixels; as you can see the fill factor is overwhelming good. While one might suspect that the differences in how these images were captured could easily account for what you are seeing, for the record, they are a fair facsimile of what you would perceive with the naked eye. The lack of detail and soft response is inherent of transmissive LCD technology.
While the projector clearly does 1:1 pixel mapping, this test not only shows response errors but also provides clues as to why a full chip DLP, as an example, would outperform it for detail and sharpness. At the viewing position, you cannot clearly make out pixels or fill factor of the DLP any more than the LCD, yet the perceived difference in response for these patterns would be strikingly clear. With real images you would note a difference in sharpness and detail.
Overscan
Via HDMI, 720p, 1080i, and 1080p all chopped off a few pixels on the right side. This also revealed an interesting observation; the projector remembers vertical and horizontal centering positions by scan rate. Via component analog video, 720p and 1080i had the same result with only a one pixel loss on the left side for 720p.
Calibration Notes
The settings constantly interacted with each other from brightness and contrast to the color temp adjustments; just one single click or numerical change could slightly throw off the whole cart for another round of adjustments. I started with NORMAL and being dissatisfied with the overall results tried CINEMA3, but that was off even more and could only be drawn in using the coarse color temp adjust in the video setup menu. In COLOR1 I found a response very close to standards and this one also used the motorized light reducing gizmo. While not documented, I set this one up achieving a similar response as I had with NORMAL but with an even lower light output. This particular setting did not require a color space adjustment having been preset by the factory on target. For most of the settings the green and blue primaries were increased for additional (and clearly beneficial) light output to sell the product, but pushing the color temperature towards cyan prevents 100% accurate color and fidelity. Another concern was the unexpected lack of fine adjustment making it difficult to get precisely on target for color temperature and tracking. These controls were no different than others I have used in the past, yet they had a coarse response for this projector. I was unable to get an overall delta C response below one, although my 30 and 80 IRE targets were correct.
Gamma (Definition)
The gamma response charts consist of a green line representing the target gamma of 2.2 and a red line representing the response of the display. The average gamma figure only has value when the lines match; otherwise your calibrator will look at the individual steps to identify and correct the problem.
NORMAL Gamma Pre-calibration
 NORMAL Gamma Post-calibration
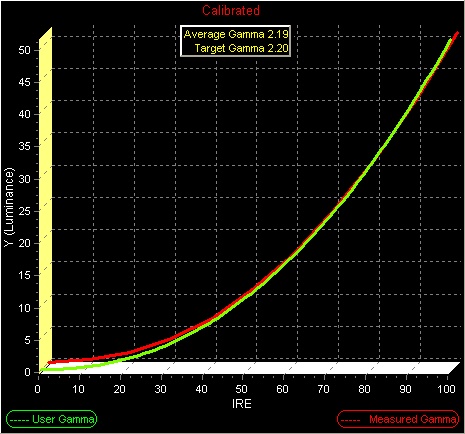 With the iris turned off the gamma was actually not bad for pre-calibration. The contrast had to be turned down significantly to even-out the steps and open up the peak white from 90 to 100IRE. This compression of gamma at the top in most cases infers a large color temperature error as well; yet another reason to try and obtain a proper response.
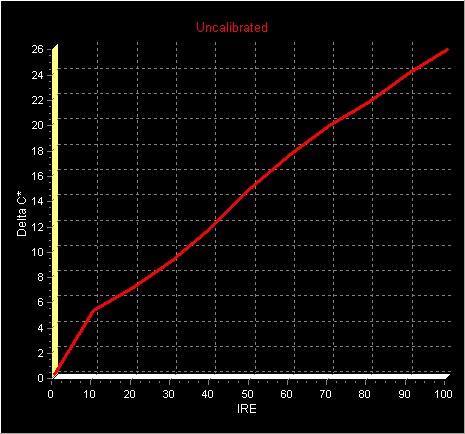
Color Temperature and Tracking (Definition)
A raw 6500 Kelvin response chart may look nice but it does not reflect a specific color. Delta C is provided instead which shows how far off from D65 the response is. The target is less than 1. Less than .5 error is considered quite good approaching a reference response. RGB response charts are included providing a much better understanding of response errors. In a perfect D65 world all three colors would be flat creating a single line response at 100% for a flawless color temperature and tracking response.
NORMAL Delta C Pre-calibration
With the iris turned off the gamma was actually not bad for pre-calibration. The contrast had to be turned down significantly to even-out the steps and open up the peak white from 90 to 100IRE. This compression of gamma at the top in most cases infers a large color temperature error as well; yet another reason to try and obtain a proper response.
Color Temperature and Tracking (Definition)
A raw 6500 Kelvin response chart may look nice but it does not reflect a specific color. Delta C is provided instead which shows how far off from D65 the response is. The target is less than 1. Less than .5 error is considered quite good approaching a reference response. RGB response charts are included providing a much better understanding of response errors. In a perfect D65 world all three colors would be flat creating a single line response at 100% for a flawless color temperature and tracking response.
NORMAL Delta C Pre-calibration
 NORMAL D65 RGB Chart Pre-calibration
 NORMAL Delta C Post-calibration
 NORMAL D65 RGB Chart Post-calibration
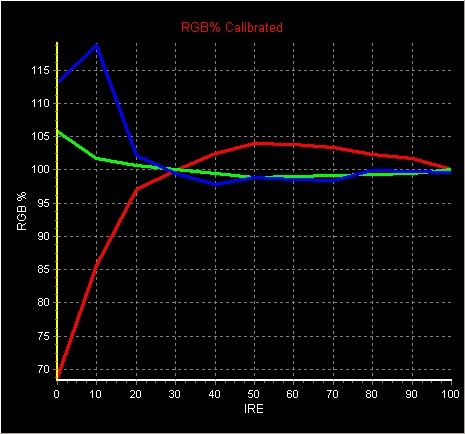 While not provided when I looked at the data charts, I could see the light output dropped by half creating a significant loss; so significant that I looked up a few front projection displays for comparison and indeed the PT-AE1000 was rather unique. It is commonly known that calibration will cause a loss in light output and a 25% drop is not unusual when bringing the two stronger primaries back into spec. Looking at the RGB chart you can see that both green and blue output were dramatically increased over red. Red is the Achilles heel of all arc lamp based displays as it is the primary with the least amount of light output. All display products have a weak primary so no big deal. What this means for an arc lamp source is to increase light output for sales and marketing you turn up green and blue since they have more light output to offer which ends up pushing the color temperature towards cyan. This creates a fairly common marginal error and correcting it has marginal impact on light output. For the Panasonic LCD this was not the case. What we see here is a heavy handed boost of green and blue creating horrendous cyan errors to provide a competitive bright image in the market. While I did not measure the results I did return the contrast back to pre-calibration which helped boost light output quite a bit while keeping things under some control. I tried returning the color temp to preset creating a huge boost in light output but that made white clearly cyan shifted.
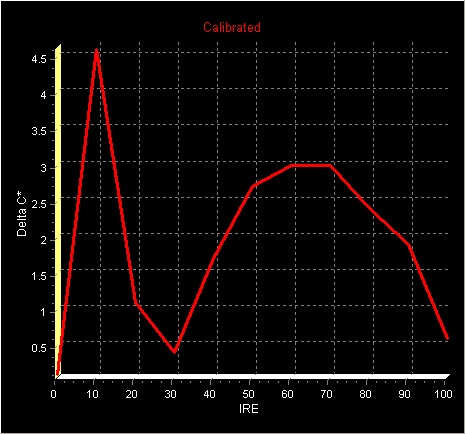
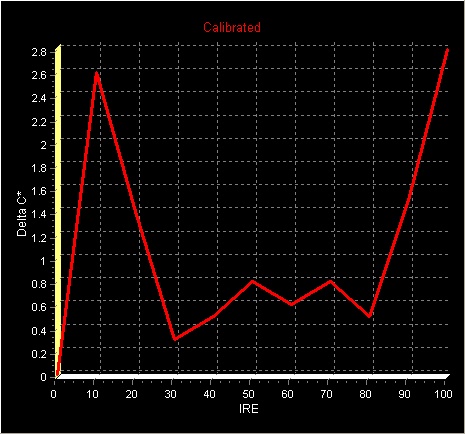
Delta C errors typically come in two peaks for many consumer displays. As mentioned earlier, the response was difficult to tame but I gave it another go and managed to squeak out the final shown here below with two strong peaks and a fairly good valley below 1, which also happens to be in the prime area of most video levels for an image. In the world of consumer displays this is an average response.
NORMAL Delta C Post-calibration (second attempt)
While not provided when I looked at the data charts, I could see the light output dropped by half creating a significant loss; so significant that I looked up a few front projection displays for comparison and indeed the PT-AE1000 was rather unique. It is commonly known that calibration will cause a loss in light output and a 25% drop is not unusual when bringing the two stronger primaries back into spec. Looking at the RGB chart you can see that both green and blue output were dramatically increased over red. Red is the Achilles heel of all arc lamp based displays as it is the primary with the least amount of light output. All display products have a weak primary so no big deal. What this means for an arc lamp source is to increase light output for sales and marketing you turn up green and blue since they have more light output to offer which ends up pushing the color temperature towards cyan. This creates a fairly common marginal error and correcting it has marginal impact on light output. For the Panasonic LCD this was not the case. What we see here is a heavy handed boost of green and blue creating horrendous cyan errors to provide a competitive bright image in the market. While I did not measure the results I did return the contrast back to pre-calibration which helped boost light output quite a bit while keeping things under some control. I tried returning the color temp to preset creating a huge boost in light output but that made white clearly cyan shifted.
Delta C errors typically come in two peaks for many consumer displays. As mentioned earlier, the response was difficult to tame but I gave it another go and managed to squeak out the final shown here below with two strong peaks and a fairly good valley below 1, which also happens to be in the prime area of most video levels for an image. In the world of consumer displays this is an average response.
NORMAL Delta C Post-calibration (second attempt)
 NORMAL D65 RGB Chart Post-calibration (second attempt)
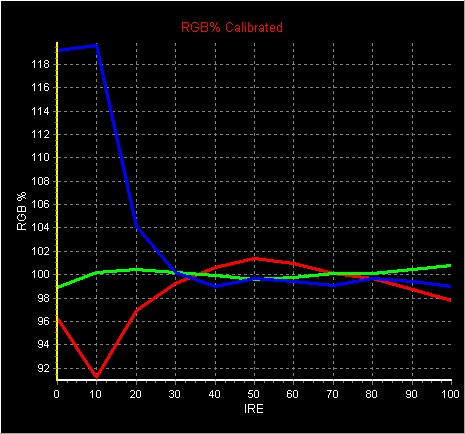 Look at all three RGB graphs and you will see red never flattens out and remains a humped response regardless. I will not say this was the last word on a proper color temperature calibration but looking at the forest rather than this one tree the meadow has more problems than this one.
Color Decoding (Definition)
Color encoding and decoding for real images creates a complex array of phase angles which can interact. It is possible to have correct color space and incorrect color decoding. Decoding is tested using patterns that provide complex phase angles. For this test I use the Sencore VP403 Color Decode, SMPTE Color Bars and the Accupel 100% and 75% Color Decoder patterns.
The product does not provide any means to isolate the red, green and blue color channels to professionally check color decoding.
The PT-AE1000 appeared to pass within the limitations and errors created when using color filters for this test.
Color Space (Definition)
Once color decoding is established then comes color space. There are various types of color space in the world with the American SMPTE C and European EBU being very similar and specified for standard definition mastering applications and broadcast studio monitoring. The new kid on the block is BT709 for HDTV which slightly expands the color space from standard definition. As to which one you should use or that I as a reviewer should reference has been debated heavily. For reviews I will be using HDTV BT709 color space. If the product provides color space management this also infers that you can calibrate for SMPTE-C or EBU if you desire unless stated otherwise.
HDTV BT709 Color Space Pre-calibration
Look at all three RGB graphs and you will see red never flattens out and remains a humped response regardless. I will not say this was the last word on a proper color temperature calibration but looking at the forest rather than this one tree the meadow has more problems than this one.
Color Decoding (Definition)
Color encoding and decoding for real images creates a complex array of phase angles which can interact. It is possible to have correct color space and incorrect color decoding. Decoding is tested using patterns that provide complex phase angles. For this test I use the Sencore VP403 Color Decode, SMPTE Color Bars and the Accupel 100% and 75% Color Decoder patterns.
The product does not provide any means to isolate the red, green and blue color channels to professionally check color decoding.
The PT-AE1000 appeared to pass within the limitations and errors created when using color filters for this test.
Color Space (Definition)
Once color decoding is established then comes color space. There are various types of color space in the world with the American SMPTE C and European EBU being very similar and specified for standard definition mastering applications and broadcast studio monitoring. The new kid on the block is BT709 for HDTV which slightly expands the color space from standard definition. As to which one you should use or that I as a reviewer should reference has been debated heavily. For reviews I will be using HDTV BT709 color space. If the product provides color space management this also infers that you can calibrate for SMPTE-C or EBU if you desire unless stated otherwise.
HDTV BT709 Color Space Pre-calibration
 HDTV BT709 Color Space Post-calibration
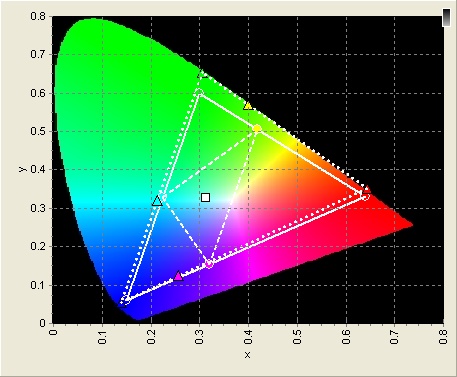
 For NORMAL using out of the box settings all three primaries fall way outside the HDTV color space. Currently this is being used as a sales marketing tool with tag lines of deep color, rich color, lifelike color, etc. While Deep Color is a new and valid technology, there are currently no sources available. This projector does not support the standard nor meet that vastly larger color space specification. In this case, and for a while to come, this is nothing but an artificial expansion of standard color space and while not accurate more or deeper color claims are perceptually valid.
This was by far the easiest alignment and it still wasn't all too easy. It provides this neat cursor that makes you think what you are adjusting is what you will get once you press enter but the projector goes through a processing sequence for your new target and you find that the target moved. Ultimately this became a song and dance of making a small adjustment and pressing enter to see where the target would end up. In the end I was able to achieve an overall satisfactory response but was unable to get the red on target for HDTV or EBU. If SMPTE-C is your target the red does line up quite well for that specification.
Y/C and RGB Color Timing (Definition)
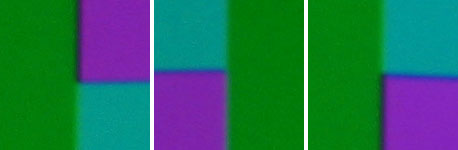
It can be difficult to define the source of errors related to this element of performance. What we are looking for is a precision alignment of luminance and the color signal as well the individual red, green and blue channels within that color signal. When this is not set properly, edges form between color blocks reducing color definition as well as creating an artifact with the right images. For this test I use the Accupel color decoding pattern. Images do not reflect accurate color but you can still identify the primary or secondary colors.
Magenta and Green Error
For NORMAL using out of the box settings all three primaries fall way outside the HDTV color space. Currently this is being used as a sales marketing tool with tag lines of deep color, rich color, lifelike color, etc. While Deep Color is a new and valid technology, there are currently no sources available. This projector does not support the standard nor meet that vastly larger color space specification. In this case, and for a while to come, this is nothing but an artificial expansion of standard color space and while not accurate more or deeper color claims are perceptually valid.
This was by far the easiest alignment and it still wasn't all too easy. It provides this neat cursor that makes you think what you are adjusting is what you will get once you press enter but the projector goes through a processing sequence for your new target and you find that the target moved. Ultimately this became a song and dance of making a small adjustment and pressing enter to see where the target would end up. In the end I was able to achieve an overall satisfactory response but was unable to get the red on target for HDTV or EBU. If SMPTE-C is your target the red does line up quite well for that specification.
Y/C and RGB Color Timing (Definition)
It can be difficult to define the source of errors related to this element of performance. What we are looking for is a precision alignment of luminance and the color signal as well the individual red, green and blue channels within that color signal. When this is not set properly, edges form between color blocks reducing color definition as well as creating an artifact with the right images. For this test I use the Accupel color decoding pattern. Images do not reflect accurate color but you can still identify the primary or secondary colors.
Magenta and Green Error
 Reference Response for All Colors
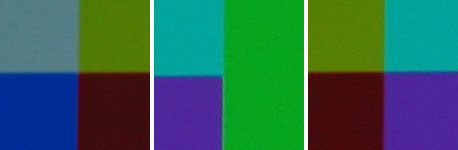 The Panasonic shows a very clear and visible error with magenta and green in the 2-3 pixel range of size. The rest were fine. Note the error between magenta and green only occurs when magenta follows green (to the left of green) as well a difference in error between magenta and cyan depending on if it is on the right or left of green. These differences are not uncommon when an error shows itself. In the reference image you can slightly detect the same type of error between magenta and green, yet this was only 1 pixel in size with a marginal error in color allowing it to blend well, making it difficult to see from the viewing position.
Edge Enhancement (Definition)
Out of the box, the display had the notorious outlining of edges, but this was eliminated using the customer controls. This also brought the lack of detail to light. Without nice sharp edges coming from the pixels themselves, a correct setting created a soft look. I did find just a glimmer of edge enhancement helped with this perception as well as improved legibility with PC text.
Multi-source Ready (Definition)
As pointed out in the beginning the product has numerous settings, features and memories plus a number of inputs duplicated. This provides myriad ways to calibrate the product for different scan rates and input types, which is a good plus for the new user. What it does not provide are individual memories related to scan rate only, which would allow a single connection to the display and memory slots that automatically get loaded as you change the scan rate you are feeding it. For performance users, this should not create a problem provided you are feeding the display sources that meet video standards output at 1080i or 1080p and many performance users already have an external scaler to address those concerns.
Contrast Ratio
This measurement is provided for the purpose of comparison only to other reviews of front projectors to illustrate true contrast ratios using a D65 calibrated color temperature using a 100IRE and 0IRE window pattern. With the dynamic iris feature, the Panasonic potentially comes with two measurements. When a projector provides that I measure the response with the dynamic iris turned off, this is a simple measurement of a 0IRE raster and 100IRE window after calibration. The probe is pointed towards the projector and moved towards it until .5fl has been obtained with a 0 IRE raster. Being able to obtain this contrast ratio on your screen will depend on how much of the light reflected off the screen gets reflected back to the screen by your room. This simple measurement does not account for the light in bright areas contaminating the black areas due to projector design and/or technology, which is called intrafield contrast ratio.
With the Dynamic Iris OFF, and using a calibrated D65 light output at 96 lamp hours, I obtained 367fl at 100IRE and .522fl for 0IRE yielding a contrast ratio of 703:1.
On the surface that is a good number. In reality it is somewhat poor because in a real system the perceived contrast is directly related to how black your blacks are. A CRT can easily have a lower contrast ratio but perceptually beat the pants off of a higher one because it can do inky jet blacks. In the world of performance front projection and micro display technology this is an average response.
Please refer to the article, HD Waveform 10 - Dynamic Iris and Gamma, for an in depth look at this feature.
Light Output
A light meter was not available to provide an accurate or meaningful number. Based on experience, this projector when calibrated is quite dim. 16:9 on my native 2.35 screen works out to 102" using a 1.4 gain. Using zoom to reduce the image to the smallest setting yielded 77" 16:9 and that was looking about right, but a bit more brightness would have been preferred. The problem here is the lamp only has about 75 hours on it and the light output will drop another 25% or more within the next 400 hours so. Being light challenged at this early stage in lamp life is not a good sign. Reverting back to manufacturer presets and some of the other setups, the screen became bright again with DYNAMIC providing plenty of punch as expected but visually that setting was error ridden which is also expected. 100" 16:9 is a commonly expected size in the home theater installation world so I would suggest a 2.0-3.0 gain screen in calibrated mode. Bear in mind screens in the 85-110" range typically vary from .8 to 1.3 based on the projector used for a committed room for a multitude of reasons; higher gains more often than not point to a unique situation. The out of box normal preset for color temperature and contrast did drive my 102" 1.4 gain to a pleasing level, which changes the perspective on lamp life and output.
Due to the extensive zoom range you have some variation in light output there as well. When set for the widest setting, the light path through the lens is spread out across the surface improving pass through efficiency. To take advantage of this will require the projector be placed quite close to the viewing screen. A disadvantage to that is that you take a hit in focus uniformity which means the edges will have a different focal point than the middle.
Lens Shift (Definition)
An installer will want to know where center is to reduce optical artifacts if you don't need the feature. Both lens shift controls provide a center detent position. There is play in these controls and they do not have a precision feel in your hand or on screen, but this is far better than the joystick approach Panasonic used in the past and with minimal tinkering you can get it very close if not right.
Noise
This was an extremely quiet projector. Increasing lamp power will also increase fan speed but even that remained at an acceptable level. Throughout testing the lamp was set for normal.
Light Leakage / Stray Light
This projector did not exhibit any light leakage.
Maintenance
While all transmissive LCD projectors have filters to keep dust from getting into the optical cooling path, not all allow easy maintenance or replacement. The Panasonic does and recommends you do so every 100 hours. Due to this attribute of the system, it does not work well for the long term in some applications such as a bar or restaurant which could easily have tobacco smoke pumped through the optical cooling path. This may even be a worthy consideration in your home if you use tobacco or burn candles. An alternative to burning candles is to use a warmer if the scent is your intent. If your intent is for ambient lighting, purchase soot-free candles. Transmissive LCD is far from impervious to the environment in which it is used, and some have felt the sting of an expensive light engine to get the clean bright image back they once had. Remember my comment about LCD melt down? It is very important you keep this filter maintained! In the extreme, if the filter gets too much material in it, then the fan will begin to suck the finest debris through the filter, which can easily end up in your optics and appear on the screen as dots and smudges.
Lamp replacement will come. The great thing is the projector will tell you at 1800 hours that you ought to order one with a 30 second message when you turn it on. After 2000 hours the message remains until you make it go aw
The Panasonic shows a very clear and visible error with magenta and green in the 2-3 pixel range of size. The rest were fine. Note the error between magenta and green only occurs when magenta follows green (to the left of green) as well a difference in error between magenta and cyan depending on if it is on the right or left of green. These differences are not uncommon when an error shows itself. In the reference image you can slightly detect the same type of error between magenta and green, yet this was only 1 pixel in size with a marginal error in color allowing it to blend well, making it difficult to see from the viewing position.
Edge Enhancement (Definition)
Out of the box, the display had the notorious outlining of edges, but this was eliminated using the customer controls. This also brought the lack of detail to light. Without nice sharp edges coming from the pixels themselves, a correct setting created a soft look. I did find just a glimmer of edge enhancement helped with this perception as well as improved legibility with PC text.
Multi-source Ready (Definition)
As pointed out in the beginning the product has numerous settings, features and memories plus a number of inputs duplicated. This provides myriad ways to calibrate the product for different scan rates and input types, which is a good plus for the new user. What it does not provide are individual memories related to scan rate only, which would allow a single connection to the display and memory slots that automatically get loaded as you change the scan rate you are feeding it. For performance users, this should not create a problem provided you are feeding the display sources that meet video standards output at 1080i or 1080p and many performance users already have an external scaler to address those concerns.
Contrast Ratio
This measurement is provided for the purpose of comparison only to other reviews of front projectors to illustrate true contrast ratios using a D65 calibrated color temperature using a 100IRE and 0IRE window pattern. With the dynamic iris feature, the Panasonic potentially comes with two measurements. When a projector provides that I measure the response with the dynamic iris turned off, this is a simple measurement of a 0IRE raster and 100IRE window after calibration. The probe is pointed towards the projector and moved towards it until .5fl has been obtained with a 0 IRE raster. Being able to obtain this contrast ratio on your screen will depend on how much of the light reflected off the screen gets reflected back to the screen by your room. This simple measurement does not account for the light in bright areas contaminating the black areas due to projector design and/or technology, which is called intrafield contrast ratio.
With the Dynamic Iris OFF, and using a calibrated D65 light output at 96 lamp hours, I obtained 367fl at 100IRE and .522fl for 0IRE yielding a contrast ratio of 703:1.
On the surface that is a good number. In reality it is somewhat poor because in a real system the perceived contrast is directly related to how black your blacks are. A CRT can easily have a lower contrast ratio but perceptually beat the pants off of a higher one because it can do inky jet blacks. In the world of performance front projection and micro display technology this is an average response.
Please refer to the article, HD Waveform 10 - Dynamic Iris and Gamma, for an in depth look at this feature.
Light Output
A light meter was not available to provide an accurate or meaningful number. Based on experience, this projector when calibrated is quite dim. 16:9 on my native 2.35 screen works out to 102" using a 1.4 gain. Using zoom to reduce the image to the smallest setting yielded 77" 16:9 and that was looking about right, but a bit more brightness would have been preferred. The problem here is the lamp only has about 75 hours on it and the light output will drop another 25% or more within the next 400 hours so. Being light challenged at this early stage in lamp life is not a good sign. Reverting back to manufacturer presets and some of the other setups, the screen became bright again with DYNAMIC providing plenty of punch as expected but visually that setting was error ridden which is also expected. 100" 16:9 is a commonly expected size in the home theater installation world so I would suggest a 2.0-3.0 gain screen in calibrated mode. Bear in mind screens in the 85-110" range typically vary from .8 to 1.3 based on the projector used for a committed room for a multitude of reasons; higher gains more often than not point to a unique situation. The out of box normal preset for color temperature and contrast did drive my 102" 1.4 gain to a pleasing level, which changes the perspective on lamp life and output.
Due to the extensive zoom range you have some variation in light output there as well. When set for the widest setting, the light path through the lens is spread out across the surface improving pass through efficiency. To take advantage of this will require the projector be placed quite close to the viewing screen. A disadvantage to that is that you take a hit in focus uniformity which means the edges will have a different focal point than the middle.
Lens Shift (Definition)
An installer will want to know where center is to reduce optical artifacts if you don't need the feature. Both lens shift controls provide a center detent position. There is play in these controls and they do not have a precision feel in your hand or on screen, but this is far better than the joystick approach Panasonic used in the past and with minimal tinkering you can get it very close if not right.
Noise
This was an extremely quiet projector. Increasing lamp power will also increase fan speed but even that remained at an acceptable level. Throughout testing the lamp was set for normal.
Light Leakage / Stray Light
This projector did not exhibit any light leakage.
Maintenance
While all transmissive LCD projectors have filters to keep dust from getting into the optical cooling path, not all allow easy maintenance or replacement. The Panasonic does and recommends you do so every 100 hours. Due to this attribute of the system, it does not work well for the long term in some applications such as a bar or restaurant which could easily have tobacco smoke pumped through the optical cooling path. This may even be a worthy consideration in your home if you use tobacco or burn candles. An alternative to burning candles is to use a warmer if the scent is your intent. If your intent is for ambient lighting, purchase soot-free candles. Transmissive LCD is far from impervious to the environment in which it is used, and some have felt the sting of an expensive light engine to get the clean bright image back they once had. Remember my comment about LCD melt down? It is very important you keep this filter maintained! In the extreme, if the filter gets too much material in it, then the fan will begin to suck the finest debris through the filter, which can easily end up in your optics and appear on the screen as dots and smudges.
Lamp replacement will come. The great thing is the projector will tell you at 1800 hours that you ought to order one with a 30 second message when you turn it on. After 2000 hours the message remains until you make it go aw