
reviews
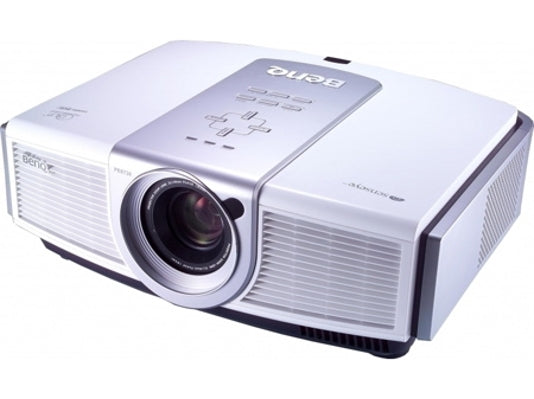
BenQ W10000 1080p DLP Front Projector
| MSRP | Street | Amazon.com | |
| Pricing at publication | $9,999.00 | $5,999.00 | N/A |
Serial #PDXB600243TVO
Warranty: 3 years parts and labor
Summary: Pixel perfect 1080p24 for the videophile performance enthusiast but there's a catch
Review Note: Two different firmware versions of the product were reviewed and tested. This review reflects the current version and differences between them are noted when applicable. To update a projector to the current firmware requires an exchange by BenQ. The new version replaces USER 2 and USER 3 presets with ISF Day and ISF Night on the remote and is noted in some portions of the technical section. After the final conclusion, you will find a quick synopsis of the main differences between the two versions.
1080p DLP front projection is slowly starting to dribble into the market but pricing has been high. BenQ is providing the W10000 for the street price of just under $6000, providing a full 1920x1080 DLP Dark Chip3 DMD far closer in price range with other recently released 1080p technology at $5k and below. As noted, this is a full 1920x1080 chip and does not use wobulation. The advantage here is the potential for a pixel perfect response. Bear in mind this also means pixels are going to be more visible but whether or not that is a problem is a matter of viewing distance. This is a single chip display utilizing an 8 segment color wheel, which also means rainbows are possible. The "rainbow effect", as its known, is a byproduct of using a color wheel to rapidly flash alternating red, green, and blue picture elements to the screen. For a small segment of the population, this can create a visible "rainbow" artifact when projected content features bright objects on a dark background (movie credits, for example). While greatly reduced over the years by adding more sections and increasing rotational speed, they are still perceptible by some viewers. Common Features- White cabinet finish
- One HDMI, BNC RGBHV, component RCA, S-video and composite input
- Accepts 480i, 480p, 720p, 1080i, 1080p and that new magic number, 1080p 24 frame
- Serial RS232 port for external control of the projector
- 12V trigger output
- Fairly good size remote that was comfortable in the hand, easy to use and includes an orange backlighting button providing great clarity for reading buttons in the dark
- Aspect controls work with all scan rates providing 4:3 and LETTERBOX screen modes, a non-linear stretch for 4:3 content to fill out your screen called WIDE, ANAMORPHIC to fill out your screen with 720p or SD 16:9 sources
- 3 color space presets and 2 grayscale presets
- first version: 3 user presets
- second version: 1 user preset, ISF Day and ISF Night presets
- PIP/POP feature limited to 480i with HD sources only. Does not support two HD sources or two 480i sources
- 10 bit digital video processing
- Remote controlled variable iris (not auto), vertical lens shift, 1.15x zoom and focus
- BNC for component or RGBHV sharing the BNC connectors
- REAL aspect control for 1X1 pixel mapping of 1080i/p, 720p and 480i/p video sources to the center of the screen or 1080 sources full screen with no overscan
- Color management
- Color decoder adjustments labeled as Enhanced Adjustments
- Auto Phase and frequency adjust or manual
- Internal Patterns: black and white box window, grid
- 0 or 7.5 IRE black level offset
- Panamorph Lens compatible supporting anamorphic 2.35 aspect screen applications - not tested
- Two lamp power settings
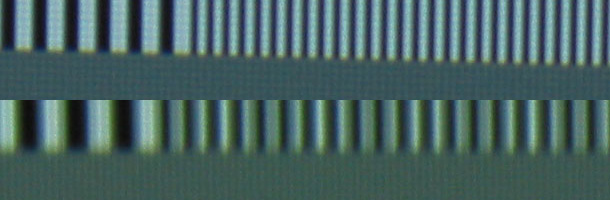 This was not the best camera shot, and pixel detail is blurred creating the misperception of thick white lines and thinner black ones. Nonetheless, a comparison makes it quite clear how the 1280 response of 720p is riddled with artifacts when remapped to 1920. The perfect transition of one pixel off and one pixel on creating a nice hard edge is replaced by a transition of in-between pixels; intermediate pixels in between peak white and black. Note that numerous white lines in the scaled image for 1280 don't even reach peak white, another clear artifact, and one of the lines in the 640 section is not the same size, being off by one pixel with a different luminance response compared to the lines on either side. At the viewing position where you are seeing the forest rather then the trees, this shows up as banding. All of these errors combined clearly degrade detail response and have the same affect on vertical pixel mapping and detail for the same reasons.
An example of banding is shown and explained in the Zenith DVD DVB318 review in our HD Library. Scroll down to the high frequency burst image from the DVE calibration DVD; note the text above and the related waveform images.
Special Note About Aspect Ratio Formatting and 1:1 Pixel Mapping
The W10000 is unique in how it handles these two concerns. Most front projectors provide the conventional 16:9 aspect setting relying on scan rate to determine when 1:1 pixel mapping should be used and do not apply excessive overscan with non-native scan rates; in this case anything that is not a 1080 scan rate. For the W10000 you have a catch 22 because you only get 1:1 pixel mapping using the REAL aspect setting but that prevents other scan rates from filling out the screen. While you can use ANAMORPHIC to fill out the screen when you return to a 1080 scan rate the screen will still be filled out; will you remember to switch back to REAL with 1080 content for the best performance? This is a real problem for most performance installers and their clients who seek simplicity and ease of use. For many applications, the solution is as simple as leaving the W10000 in REAL mode, setup up all your sources to output 1080 only and use aspect ratio formatting from those sources instead of the projector. Most clients will find this acceptable and watch the occasional content that gets geometrically distorted, such as special features on an SD DVD. Some clients won't accept that and the typical solution is an external scaler. There are myriad ways to overcome this and the key point here was to make the potential buyer aware of this.
I love the REAL aspect feature and BenQ should keep that feature intact! If BenQ would replace ANAMORPHIC with the conventional method employed by other manufacturers for a16:9 aspect ratio, it would be a great step forward for future products.
Gamma (Definition)
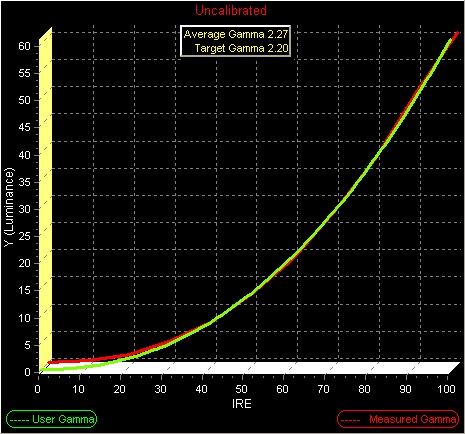
The gamma response charts consist of a green line representing the target gamma of 2.2 and a red line representing the response of the display. The average gamma figure only has value when the lines match; otherwise your calibrator will look at the individual steps to identify and correct the problem.
Gamma Pre-calibration
This was not the best camera shot, and pixel detail is blurred creating the misperception of thick white lines and thinner black ones. Nonetheless, a comparison makes it quite clear how the 1280 response of 720p is riddled with artifacts when remapped to 1920. The perfect transition of one pixel off and one pixel on creating a nice hard edge is replaced by a transition of in-between pixels; intermediate pixels in between peak white and black. Note that numerous white lines in the scaled image for 1280 don't even reach peak white, another clear artifact, and one of the lines in the 640 section is not the same size, being off by one pixel with a different luminance response compared to the lines on either side. At the viewing position where you are seeing the forest rather then the trees, this shows up as banding. All of these errors combined clearly degrade detail response and have the same affect on vertical pixel mapping and detail for the same reasons.
An example of banding is shown and explained in the Zenith DVD DVB318 review in our HD Library. Scroll down to the high frequency burst image from the DVE calibration DVD; note the text above and the related waveform images.
Special Note About Aspect Ratio Formatting and 1:1 Pixel Mapping
The W10000 is unique in how it handles these two concerns. Most front projectors provide the conventional 16:9 aspect setting relying on scan rate to determine when 1:1 pixel mapping should be used and do not apply excessive overscan with non-native scan rates; in this case anything that is not a 1080 scan rate. For the W10000 you have a catch 22 because you only get 1:1 pixel mapping using the REAL aspect setting but that prevents other scan rates from filling out the screen. While you can use ANAMORPHIC to fill out the screen when you return to a 1080 scan rate the screen will still be filled out; will you remember to switch back to REAL with 1080 content for the best performance? This is a real problem for most performance installers and their clients who seek simplicity and ease of use. For many applications, the solution is as simple as leaving the W10000 in REAL mode, setup up all your sources to output 1080 only and use aspect ratio formatting from those sources instead of the projector. Most clients will find this acceptable and watch the occasional content that gets geometrically distorted, such as special features on an SD DVD. Some clients won't accept that and the typical solution is an external scaler. There are myriad ways to overcome this and the key point here was to make the potential buyer aware of this.
I love the REAL aspect feature and BenQ should keep that feature intact! If BenQ would replace ANAMORPHIC with the conventional method employed by other manufacturers for a16:9 aspect ratio, it would be a great step forward for future products.
Gamma (Definition)
The gamma response charts consist of a green line representing the target gamma of 2.2 and a red line representing the response of the display. The average gamma figure only has value when the lines match; otherwise your calibrator will look at the individual steps to identify and correct the problem.
Gamma Pre-calibration
 Gamma Post-calibration
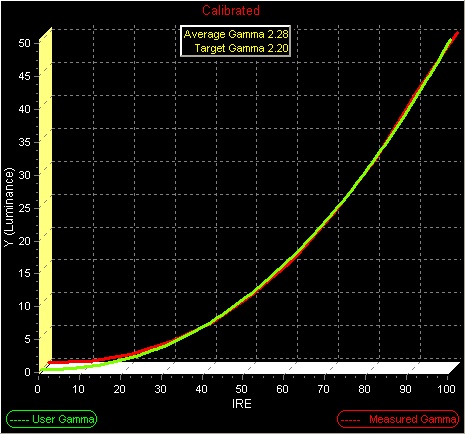 Out of the box, the W10000 doesn't do anything wacky with gamma to sell it, as shown by the near-perfect similar response.
Color Temperature and Tracking (Definition)
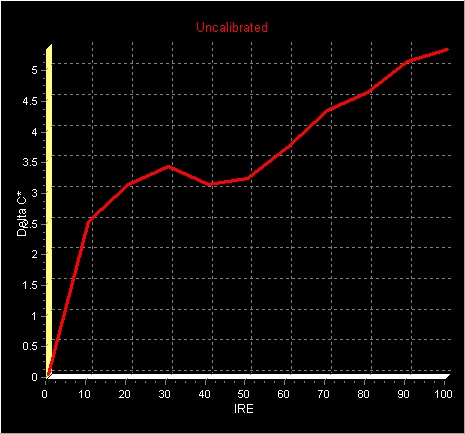
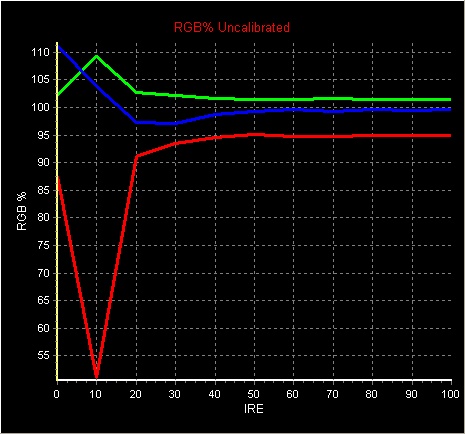
A raw 6500 Kelvin response chart may look nice but it does not reflect a specific color. Delta C is provided instead which shows how far off from D65 the response is. The target is less than 1. Less than .5 error is considered quite good approaching a reference response. RGB response charts are included providing a much better understanding of response errors. In a perfect D65 world all three colors would be flat, creating a single line response at 100% for a flawless color temperature and tracking response.
Delta C Pre-calibration
Out of the box, the W10000 doesn't do anything wacky with gamma to sell it, as shown by the near-perfect similar response.
Color Temperature and Tracking (Definition)
A raw 6500 Kelvin response chart may look nice but it does not reflect a specific color. Delta C is provided instead which shows how far off from D65 the response is. The target is less than 1. Less than .5 error is considered quite good approaching a reference response. RGB response charts are included providing a much better understanding of response errors. In a perfect D65 world all three colors would be flat, creating a single line response at 100% for a flawless color temperature and tracking response.
Delta C Pre-calibration
 D65 RGB Chart Pre-calibration
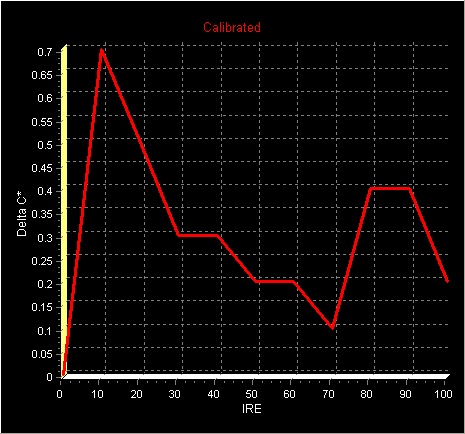
 Delta C Post-calibration
 D65 RGB Chart Post-calibration
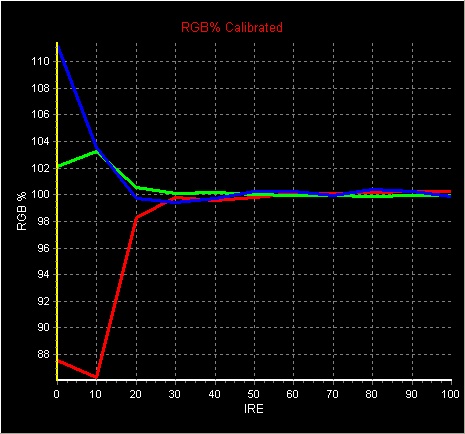 Out of the box, pre-calibration, the W10000 has a Delta C error of 2.5 to 5.5 and the RGB chart shows this error is driven towards cyan by increasing both green and blue output over red. Red is the Achilles Heel of all arc lamp based displays as it is the primary with the least amount of light output. All display products have a weak primary so no big deal. What this means for an arc lamp light source is to increase light output for sales and marketing you turn up green and blue since they have more light output to offer which ends up pushing the color temperature towards cyan. This creates a fairly common marginal error for such products and correcting it had marginal impact on light output.
For post-calibration the W10000 provides an excellent response for a consumer display pushing a near reference response except for the bottom end of black exceeding a .5 Delta C error. The RGB chart mirrors this excellent response and subjective viewing showed no obvious errors in the blacks. Errors below one can be difficult to perceive for the layman but is likely to be seen by a colorist professional. If you are doing professional work, this could cause an ever so slight color error that one might be tempted to compensate for when compared to the reference.
Color Decoding (Definition)
Color encoding and decoding for real images creates a complex array of phase angles which can interact. It is possible to have correct color space and incorrect color decoding. Decoding is tested using patterns that provide complex phase angles. For this test, I use the Sencore VP403 Color Decode, SMPTE Color Bars and the Accupel 100% and 75% Color Decoder patterns.
In the service menu for calibration, the BenQ does have blue channel isolation for setting color and tint but does not provide any means to isolate the red and green channels to professionally check color decoding.
This area of response is directly related to the Color Enhancement and, oddly enough, the 3D Color Management sections of the customer menu. Color Enhancement is one of those goofy color processes similar to the Mitsubishi Perfect Color that consumers perceive as useful and calibrators find totally annoying because neither one correctly address color decoding alignments, and using them can easily cause a lot more harm than good. The short version of the harm for the W10000 is that using these adjustments only affects unique phase angles for the color. Where you should have the same color and intensity of yellow within different sections of a color decoding pattern you would see a different response solely due to what other colors are next to it, the complex phase angle of color decoding. For the W10000, I calibrated two different ways; first using Color Enhancement and 3D Color Management to improve the color decoder; and second, ignoring it completely using only 3D color management. Both calibrations produced comparable results. This test became necessary because when calibrating in the service menu, the Color Enhancement controls do not appear and all you have to work with is 3D Color Management. While 3D Color management should only address color space it includes a saturation adjustment that only affects color decoding.
In the end I simply felt better about color decoding when the Color Enhancement controls are available. With HDMI and 1080p capability being the cat's meow, I calibrated HDMI using the customer menu and the analog video component input using the service menu.
Color Space (Definition)
Once color decoding is established, we then address color space. There are various types of color space in the world with the American SMPTE C and European EBU being very similar and specified for standard definition mastering applications and broadcast studio monitoring. The new kid on the block is BT709 for HDTV which slightly expands the color space from standard definition. As to which one you should use, or that I as a reviewer should reference, has been debated heavily. For reviews I will be using HDTV BT709 color space. If the product provides color space management this also infers that you can calibrate for SMPTE-C or EBU if you desire unless stated otherwise.
HDTV BT709 Color Space Pre-calibration
Out of the box, pre-calibration, the W10000 has a Delta C error of 2.5 to 5.5 and the RGB chart shows this error is driven towards cyan by increasing both green and blue output over red. Red is the Achilles Heel of all arc lamp based displays as it is the primary with the least amount of light output. All display products have a weak primary so no big deal. What this means for an arc lamp light source is to increase light output for sales and marketing you turn up green and blue since they have more light output to offer which ends up pushing the color temperature towards cyan. This creates a fairly common marginal error for such products and correcting it had marginal impact on light output.
For post-calibration the W10000 provides an excellent response for a consumer display pushing a near reference response except for the bottom end of black exceeding a .5 Delta C error. The RGB chart mirrors this excellent response and subjective viewing showed no obvious errors in the blacks. Errors below one can be difficult to perceive for the layman but is likely to be seen by a colorist professional. If you are doing professional work, this could cause an ever so slight color error that one might be tempted to compensate for when compared to the reference.
Color Decoding (Definition)
Color encoding and decoding for real images creates a complex array of phase angles which can interact. It is possible to have correct color space and incorrect color decoding. Decoding is tested using patterns that provide complex phase angles. For this test, I use the Sencore VP403 Color Decode, SMPTE Color Bars and the Accupel 100% and 75% Color Decoder patterns.
In the service menu for calibration, the BenQ does have blue channel isolation for setting color and tint but does not provide any means to isolate the red and green channels to professionally check color decoding.
This area of response is directly related to the Color Enhancement and, oddly enough, the 3D Color Management sections of the customer menu. Color Enhancement is one of those goofy color processes similar to the Mitsubishi Perfect Color that consumers perceive as useful and calibrators find totally annoying because neither one correctly address color decoding alignments, and using them can easily cause a lot more harm than good. The short version of the harm for the W10000 is that using these adjustments only affects unique phase angles for the color. Where you should have the same color and intensity of yellow within different sections of a color decoding pattern you would see a different response solely due to what other colors are next to it, the complex phase angle of color decoding. For the W10000, I calibrated two different ways; first using Color Enhancement and 3D Color Management to improve the color decoder; and second, ignoring it completely using only 3D color management. Both calibrations produced comparable results. This test became necessary because when calibrating in the service menu, the Color Enhancement controls do not appear and all you have to work with is 3D Color Management. While 3D Color management should only address color space it includes a saturation adjustment that only affects color decoding.
In the end I simply felt better about color decoding when the Color Enhancement controls are available. With HDMI and 1080p capability being the cat's meow, I calibrated HDMI using the customer menu and the analog video component input using the service menu.
Color Space (Definition)
Once color decoding is established, we then address color space. There are various types of color space in the world with the American SMPTE C and European EBU being very similar and specified for standard definition mastering applications and broadcast studio monitoring. The new kid on the block is BT709 for HDTV which slightly expands the color space from standard definition. As to which one you should use, or that I as a reviewer should reference, has been debated heavily. For reviews I will be using HDTV BT709 color space. If the product provides color space management this also infers that you can calibrate for SMPTE-C or EBU if you desire unless stated otherwise.
HDTV BT709 Color Space Pre-calibration
 HDTV BT709 Color Space Post-calibration
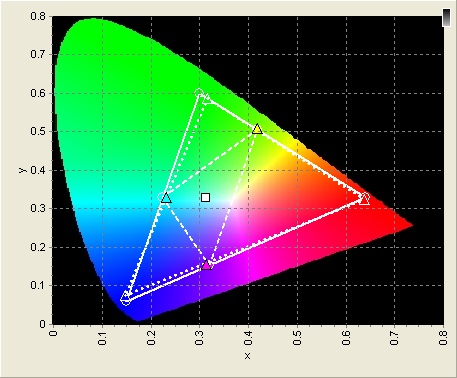 The W10000 response was a bit surprising for this alignment. Ultimately the color segments on the color wheel are outside of all industry standard color spaces and it is color management that brings them back in, on target. The color wheel creates a green primary way above the green target and some manufacturers leave it that way along with red or blue to differentiate their final image from competitors in the market place. Out of the box, the green veers towards yellow as well as pushing towards the edge of the chart. Using 3D Color Management I was unable to get the green on target. Looking at blue you can see it is slightly off and the controls allowed a precision alignment all around the target but not on target. Because the green can't reach its target, that has an effect on the secondary of cyan, between green and blue, as that is a byproduct of color decoding based on the primaries. I contacted BenQ about this mystery with green and was told that any change to this response will have to wait for the next generation product. Considering the level of performance provided so far, this was very unfortunate as the product is capable and would have allowed the end user to calibrate for any of the industry standard color spaces used around the world.
As with the wacky color processing used by Color Enhancement, the 3D Color Management provided a similar trait by providing color decoder saturation controls for the secondaries which plays absolutely no role in color decoding since their saturation point is a byproduct of proper color decoding for the primaries.
Y/C and RGB Color Timing (Definition)
It can be difficult to define the source of errors related to this element of performance. What we are looking for is a precision alignment of luminance and the color signal as well the individual red, green and blue channels within that color signal. When this is not set properly, edges form between color blocks reducing color definition and creating an artifact with the right images. For this test I use the Accupel color decoding pattern. Images do not reflect accurate color but you can still identify the primary or secondary colors.
The W10000 response was a bit surprising for this alignment. Ultimately the color segments on the color wheel are outside of all industry standard color spaces and it is color management that brings them back in, on target. The color wheel creates a green primary way above the green target and some manufacturers leave it that way along with red or blue to differentiate their final image from competitors in the market place. Out of the box, the green veers towards yellow as well as pushing towards the edge of the chart. Using 3D Color Management I was unable to get the green on target. Looking at blue you can see it is slightly off and the controls allowed a precision alignment all around the target but not on target. Because the green can't reach its target, that has an effect on the secondary of cyan, between green and blue, as that is a byproduct of color decoding based on the primaries. I contacted BenQ about this mystery with green and was told that any change to this response will have to wait for the next generation product. Considering the level of performance provided so far, this was very unfortunate as the product is capable and would have allowed the end user to calibrate for any of the industry standard color spaces used around the world.
As with the wacky color processing used by Color Enhancement, the 3D Color Management provided a similar trait by providing color decoder saturation controls for the secondaries which plays absolutely no role in color decoding since their saturation point is a byproduct of proper color decoding for the primaries.
Y/C and RGB Color Timing (Definition)
It can be difficult to define the source of errors related to this element of performance. What we are looking for is a precision alignment of luminance and the color signal as well the individual red, green and blue channels within that color signal. When this is not set properly, edges form between color blocks reducing color definition and creating an artifact with the right images. For this test I use the Accupel color decoding pattern. Images do not reflect accurate color but you can still identify the primary or secondary colors.
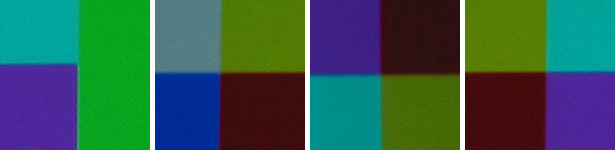 While the above image appears perfect, note that magenta in the 1st, 3rd and 4th blocks has a one-pixel error when it transitions with green and cyan, creating a 1 pixel darker line very evident in the 1st block. While not reference, this near perfect response was excellent compared to other consumer displays.
Edge Enhancement (Definition)
Out of the box, the display had the notorious outlining of edges, but this was eliminated using the customer controls.
Multi-source Ready (Definition)
The W10000 is limited by having only three presets available, and does not provide different data tables based on scan rate. In most applications this is not going to be very relevant for a product like this but due to the well-aligned nature of the internal scaler, three would cover most applications. While this holds true for the first version, it does not for the second because the ISF Day and Night settings cannot be remembered in the customer menu, only in the service menu. So the second version requires a calibrator to implement these two presets, or service menu access, which consumers are not supposed to have.
Contrast Ratio
This measurement is provided only for the purpose of comparison to my other reviews in order to illustrate true contrast ratios using a D65 calibrated color temperature and a 100IRE and 0IRE window pattern. This is a simple measurement of a 0IRE raster and 100IRE window after calibration. The probe is pointed towards the projector and moved towards it until .5fl has been obtained with a 0 IRE raster. Being able to obtain this contrast ratio on your screen will depend on how much of the light reflected off the screen gets reflected back to the screen by your room. This simple measurement does not account for the light in bright areas contaminating the black areas due to projector design and/or technology, which is called intrafield contrast ratio.
With the manual iris wide open, and using a calibrated D65 light output at 168 lamp hours, I obtained 501fl at 100IRE and .447fl for 0IRE yielding a contrast ratio of 1120:1.
Manual Iris
The unit provides a manual iris adjustment which provides two benefits. First and foremost, the ability to tune the light output for your application for the best balance of black and peak white. While I could close it up for near CRT black, peak light output suffered. This is a feature I love but it should be noted that an iris cannot improve overall dynamic range and you will get whatever natural dynamic range the technology offers, so consider this more of a brightness or back light feature to match the ambient light in the viewing environment. The other iris benefit is one of intra field contrast ratio. This relates to what happens to the light as it passed through the optics. Optics are not 100% efficient and cause some of that light to scatter, which then enters areas that may be darker. This is where the black and white checker board pattern comes in to play by measuring the light output from the black and white boxes yielding a real world contrast ratio. By turning the iris up so the picture gets darker, less light will enter the optics and that in turn reduces light scatter improving intra field contrast ratios. Taking this measurement is difficult, but I did note a slight improvement by doing so, which was to be expected. In my application I used the iris for better blacks with video content and opened it up all the way for graphics such as gaming and the computer.
Light Output
A light meter was not available to provide an accurate or meaningful number. Based on experience, this projector when calibrated had healthy light output similar to most DLPs. 16:9 on my native 2.35 screen works out to 102" using a 1.4 gain and it looked fantastic. Increasing image size to fill out my 2.35 aspect screen yields a 135" 16:9 screen and that still had plenty of life. Gee, and that was with the lamp in low power mode!
Day and Night Settings and ISF CCC
Over the last couple of years this has become a new feature in the control menu or on the remote for some displays that changes calibration settings based on ambient room light at the push of a button. Unfortunately, many displays cannot do that and maintain relative accuracy. The W10000 is a surprising exception due to the manual iris and lamp power settings that are part of the user memory function for the ISF Day and Night presets. The difference in light output is significant enough that this projector could be implemented in a dark/medium room or medium/bright room. If this is an application you are seeking for this product, I highly recommend you work with a professional to select the proper screen size and gain along with a calibration of the presets for optimal results. There are only a handful of products that can do dark/bright applications accurately.
The new firmware version supports the ISF CCC interface for calibration and alignment representing the ISF Day and Night preset modes. In the past this feature required an interface for a PC to access it, but the W10000 breaks new ground by allowing access via the service menu which is a huge plus since most calibrators have not had enough demand to justify the additional expense for the interface. Many calibrators have also recommended against using the feature because in past implementations all customer controls were blocked. The W10000 is ground breaking yet again for the ISF CCC system by allowing the user to make adjustments to these presets. Bear in mind doing so does not allow you to change the memory settings and your changes are only active during that particular viewing session which are reset to the reference values input by your calibrator once you cycle the power. This is a huge plus since any change you would want would also be related to the content you are viewing at that time.
Lens Shift (Definition)
The W10000 offers quite a bit of range. The alignment is done via your remote and provides a precision adjustment for this feature. An installer will want to know where center is to reduce optical artifacts if you don't need the feature. This was not available for the first version but is available via the service menu only in the second version with the ISF Day/Night modes.
Noise
This was an extremely quiet projector if not the quietest so far for me. Increasing lamp power will also increase fan speed but even that remained at a very acceptable level. Throughout testing, the lamp was set for normal.
Light Leakage / Stray Light
Due to my application, there was a circular strip of light appearing about 2 feet to the right of the screen. This will not be a big deal though for most users with a dark colored room. Rather than light leakage though, this comes from the reflective finished ring part of the lens housing and could easily be related to excessive lens shift in my application. This light would have to be a byproduct of flares within the optics since the image is clearly not striking this surface. If this is a problem, a strip of black cloth or felt applied to the inside of the ring should resolve it.
DLP Rainbow Artifacts
While I saw less of them than I did with my Samsung SPH710, and far less than my Samsung HLP5063, they nonetheless showed up on occasion. This artifact is something I have grown used to and making them show up is a function of image contrast ratio, lots of black with some peak white, and eye movement, meaning your eyes scanning the image up and down or side to side. You cannot see rainbows if you look at the same place on the screen. Note that this artifact is rarely seen by most viewers but there are some folks sensitive to it, which not only see this with DLP but CRT rear projection as well! Screen gain plays a huge role in how visible it can be!
Maintenance
Some DLP products have filters while others do not. The reason to have one is because dust builds up on the fan blades and cooling areas reduce cooling efficiency. The engineers at BenQ decided the W10000 should have one. The filter needs to be cleaned/replaced every 1000
While the above image appears perfect, note that magenta in the 1st, 3rd and 4th blocks has a one-pixel error when it transitions with green and cyan, creating a 1 pixel darker line very evident in the 1st block. While not reference, this near perfect response was excellent compared to other consumer displays.
Edge Enhancement (Definition)
Out of the box, the display had the notorious outlining of edges, but this was eliminated using the customer controls.
Multi-source Ready (Definition)
The W10000 is limited by having only three presets available, and does not provide different data tables based on scan rate. In most applications this is not going to be very relevant for a product like this but due to the well-aligned nature of the internal scaler, three would cover most applications. While this holds true for the first version, it does not for the second because the ISF Day and Night settings cannot be remembered in the customer menu, only in the service menu. So the second version requires a calibrator to implement these two presets, or service menu access, which consumers are not supposed to have.
Contrast Ratio
This measurement is provided only for the purpose of comparison to my other reviews in order to illustrate true contrast ratios using a D65 calibrated color temperature and a 100IRE and 0IRE window pattern. This is a simple measurement of a 0IRE raster and 100IRE window after calibration. The probe is pointed towards the projector and moved towards it until .5fl has been obtained with a 0 IRE raster. Being able to obtain this contrast ratio on your screen will depend on how much of the light reflected off the screen gets reflected back to the screen by your room. This simple measurement does not account for the light in bright areas contaminating the black areas due to projector design and/or technology, which is called intrafield contrast ratio.
With the manual iris wide open, and using a calibrated D65 light output at 168 lamp hours, I obtained 501fl at 100IRE and .447fl for 0IRE yielding a contrast ratio of 1120:1.
Manual Iris
The unit provides a manual iris adjustment which provides two benefits. First and foremost, the ability to tune the light output for your application for the best balance of black and peak white. While I could close it up for near CRT black, peak light output suffered. This is a feature I love but it should be noted that an iris cannot improve overall dynamic range and you will get whatever natural dynamic range the technology offers, so consider this more of a brightness or back light feature to match the ambient light in the viewing environment. The other iris benefit is one of intra field contrast ratio. This relates to what happens to the light as it passed through the optics. Optics are not 100% efficient and cause some of that light to scatter, which then enters areas that may be darker. This is where the black and white checker board pattern comes in to play by measuring the light output from the black and white boxes yielding a real world contrast ratio. By turning the iris up so the picture gets darker, less light will enter the optics and that in turn reduces light scatter improving intra field contrast ratios. Taking this measurement is difficult, but I did note a slight improvement by doing so, which was to be expected. In my application I used the iris for better blacks with video content and opened it up all the way for graphics such as gaming and the computer.
Light Output
A light meter was not available to provide an accurate or meaningful number. Based on experience, this projector when calibrated had healthy light output similar to most DLPs. 16:9 on my native 2.35 screen works out to 102" using a 1.4 gain and it looked fantastic. Increasing image size to fill out my 2.35 aspect screen yields a 135" 16:9 screen and that still had plenty of life. Gee, and that was with the lamp in low power mode!
Day and Night Settings and ISF CCC
Over the last couple of years this has become a new feature in the control menu or on the remote for some displays that changes calibration settings based on ambient room light at the push of a button. Unfortunately, many displays cannot do that and maintain relative accuracy. The W10000 is a surprising exception due to the manual iris and lamp power settings that are part of the user memory function for the ISF Day and Night presets. The difference in light output is significant enough that this projector could be implemented in a dark/medium room or medium/bright room. If this is an application you are seeking for this product, I highly recommend you work with a professional to select the proper screen size and gain along with a calibration of the presets for optimal results. There are only a handful of products that can do dark/bright applications accurately.
The new firmware version supports the ISF CCC interface for calibration and alignment representing the ISF Day and Night preset modes. In the past this feature required an interface for a PC to access it, but the W10000 breaks new ground by allowing access via the service menu which is a huge plus since most calibrators have not had enough demand to justify the additional expense for the interface. Many calibrators have also recommended against using the feature because in past implementations all customer controls were blocked. The W10000 is ground breaking yet again for the ISF CCC system by allowing the user to make adjustments to these presets. Bear in mind doing so does not allow you to change the memory settings and your changes are only active during that particular viewing session which are reset to the reference values input by your calibrator once you cycle the power. This is a huge plus since any change you would want would also be related to the content you are viewing at that time.
Lens Shift (Definition)
The W10000 offers quite a bit of range. The alignment is done via your remote and provides a precision adjustment for this feature. An installer will want to know where center is to reduce optical artifacts if you don't need the feature. This was not available for the first version but is available via the service menu only in the second version with the ISF Day/Night modes.
Noise
This was an extremely quiet projector if not the quietest so far for me. Increasing lamp power will also increase fan speed but even that remained at a very acceptable level. Throughout testing, the lamp was set for normal.
Light Leakage / Stray Light
Due to my application, there was a circular strip of light appearing about 2 feet to the right of the screen. This will not be a big deal though for most users with a dark colored room. Rather than light leakage though, this comes from the reflective finished ring part of the lens housing and could easily be related to excessive lens shift in my application. This light would have to be a byproduct of flares within the optics since the image is clearly not striking this surface. If this is a problem, a strip of black cloth or felt applied to the inside of the ring should resolve it.
DLP Rainbow Artifacts
While I saw less of them than I did with my Samsung SPH710, and far less than my Samsung HLP5063, they nonetheless showed up on occasion. This artifact is something I have grown used to and making them show up is a function of image contrast ratio, lots of black with some peak white, and eye movement, meaning your eyes scanning the image up and down or side to side. You cannot see rainbows if you look at the same place on the screen. Note that this artifact is rarely seen by most viewers but there are some folks sensitive to it, which not only see this with DLP but CRT rear projection as well! Screen gain plays a huge role in how visible it can be!
Maintenance
Some DLP products have filters while others do not. The reason to have one is because dust builds up on the fan blades and cooling areas reduce cooling efficiency. The engineers at BenQ decided the W10000 should have one. The filter needs to be cleaned/replaced every 1000